This is the most recent version of the trailer.
Quick update
All the names are homages to B Movie/ Actors from that era. Just thought I'd get that in there…
This is the most recent version of the trailer.
This is the most recent version of the trailer.
Final Product for the Hand in
This is the product I submitted.
After watching it back I realised all the details I missed out on, such as the actors names and the titles at the end. I'm going to keep working on this project, even though I won't get marked on the final piece, I would still like to finish it as it will be going on my reel. I aim to get it done by the Viva review. Hopefully I will manage to do the stop motion scene as well, because that was the scene that would've made the film.
FInal Comp / Edit
I used Adobe After Effects for the compositing.
I started out by keying out the background from the Maya scene.

I then added it over the 2D Illustrator background.

I then added the grainy, old film effect.

And finally, I added a colour correction layer on top, making the whole scene black and white.

I followed the exact same route for the creature scene, resulting in this.

After compositing all the scenes, I imported them into Adobe Premiere Pro, where I edited the whole film together and added the audio track.

Composition.
As I was running out of time I decided to keep the models static as opposed to adding some slight movements as I had planned previously.
I positioned the models according to the animatic. Some of the backgrounds/environments were created in Maya, others were added later in After effects.


For the creature scenes I ended up having to use a still frame, as I wasn't able to find a camera that was compatible with the stop motion software.

Soundtrack
For the soundtrack I contacted an American music student, Nate Weil, through an animation website. He posted an ad looking to work with someone who's animating a short film. I showed Nate my animatic and some examples of B movie trailers in order to explain how I want the background music to sound.
He was very quick to reply and started working on the track straight away. We kept in contact for the next few months, he would send me a track and I would give him feedback on what I liked and what I felt could be changed. He was very good at taking my feedback on board and after a few revisions he came up with this final version, which I will be using in my film. This track already comes with the voice over I had recorded earlier.
Here is the audio file.
Creating the Creature
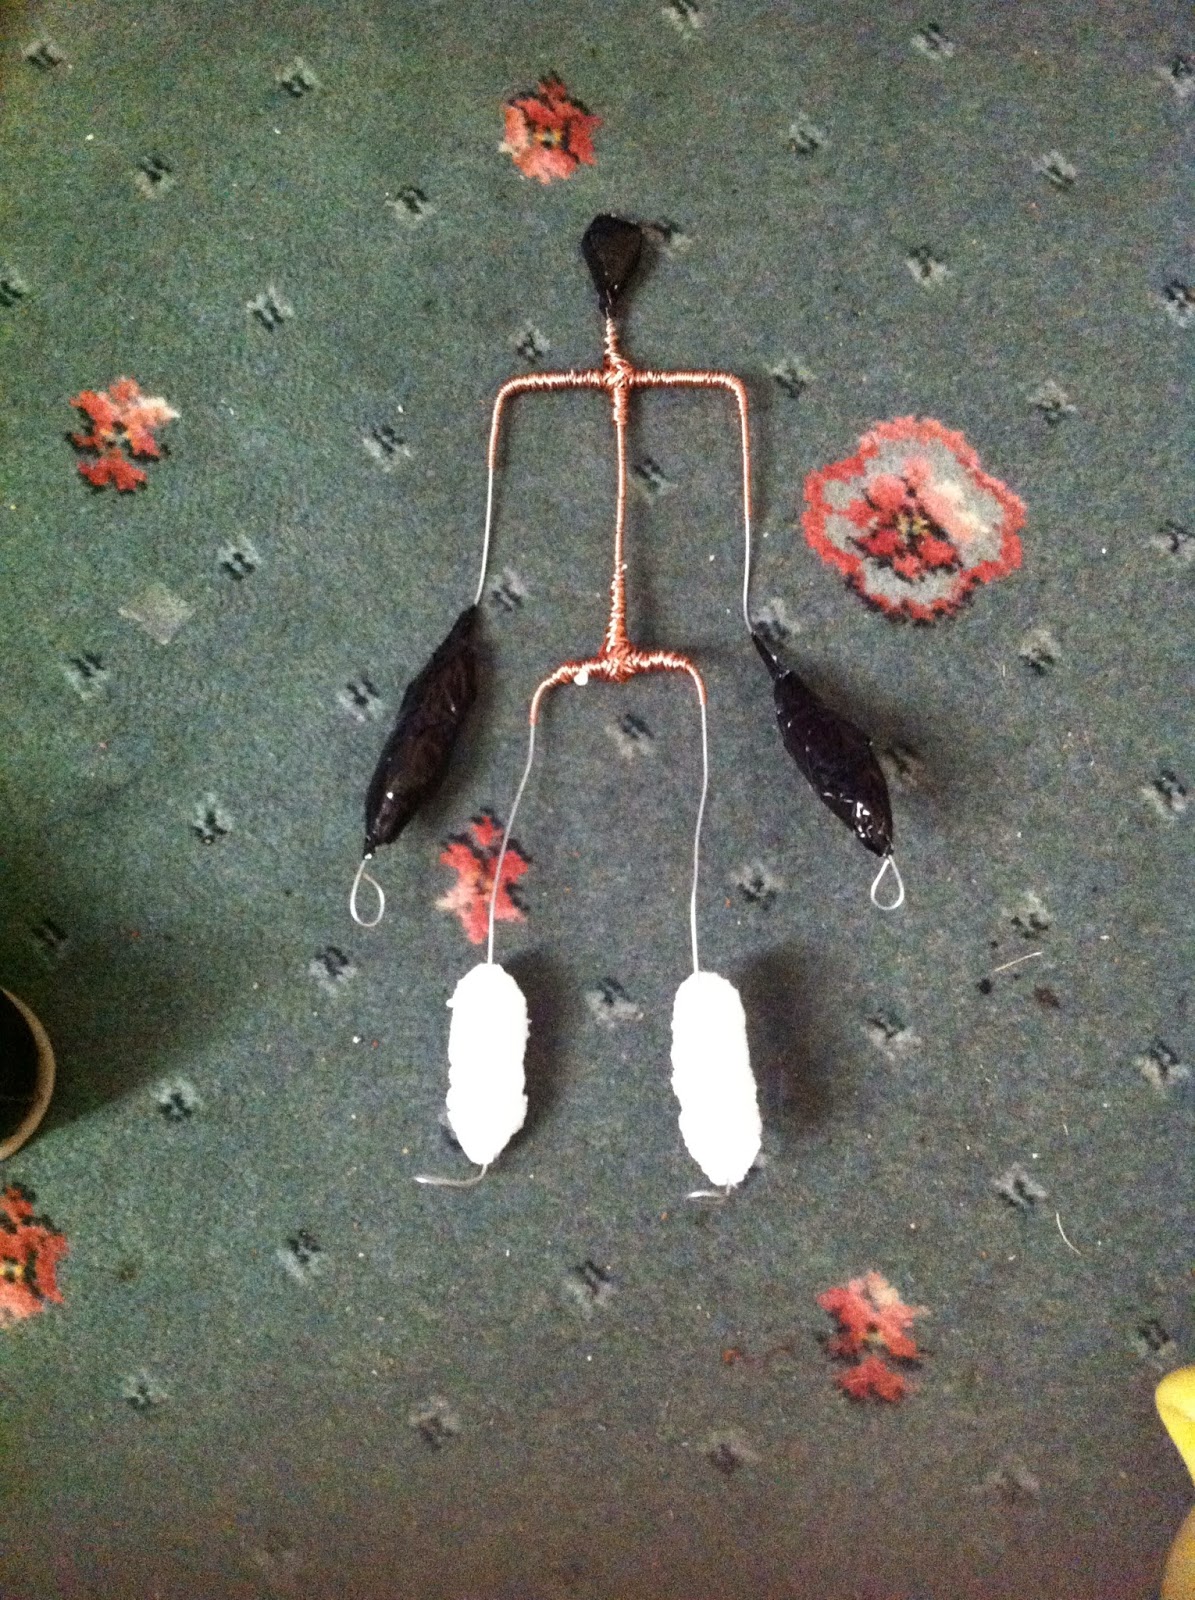
As I mentioned earlier I had made an armature before, but it was too stiff to bend as i had wrapped 2 aluminum wires together to make it more sturdy.
This time i started by creating the basic shape of the armature with aluminium wire, joining them with copper wire, which is a lot thinner and more flexible.

I then wrapped the copper wire around the joints to make them sturdier.

I kept adding more copper wire until the armature started to take shape and the shoulders and hips no longer moved seperately from the spine.

After this I started to block out the larger shapes by cutting out shapes out of polystyrene and attaching them to the areas that needed bulking up, such as the head.

I secured the Polystyrene by wrapping duct tape around it.

I continued bulking up the model this way.


After I was happy with the shape of the armature I started working on the modelling clay. I mixed together the green and the brown plasticine to create a swampy colour. I also left some clean green plasticine for the details. I started bulking out the model.

After I was happy with the shape, I added more details with the green plasticine, such as the abs and the face. I didn't have any sculpting tools, so I ended up using a thin crochet hook to add more details, such as the abs and the pecks and the nostrils. For the eyes I coloured in 2 sewing pins with a black marker pen and stuck them in. For the mouth I cut out a small piece of white card, coloured it in and stuck it on the face.

This is the finished model.


Modelling the 3D Characters/ UFO Scene
As mentioned before I've had some issues modelling the characters. I decided to stick with Maya, as it would be easier to retopo the character and my designs were simple enough to make straight in there. Also after a chat with my supervisor I decided to cut down the number of characters from 6 to 4, due to time restrictions and my less than perfect modelling skills.
During my first attempt in Maya the character was split in the middle and I didnt know how to fix it (I later learned how easy this was to fix). So it looked like this once smoothed.


I then started working on the UFO Scene. I had already created the background for it in Illustrator, so all I needed was a basic 3D model of a spacecraft close to the one in my animatic. So this is what I came up with.


During my first attempt in Maya the character was split in the middle and I didnt know how to fix it (I later learned how easy this was to fix). So it looked like this once smoothed.
The model was very rough and lumpy, so I had to keep upping the Res and in the end the file size was ridiculous for a model so simple. So I decided to go back to Maya, watch some videos on Digital Tutors and do it properly from the beginning.
This time I started with the main male character, Johnny.
This was the basic boxing out of the character. I then added more shape and smoothed it out.
I then started working on the head. Which looked pretty horrifying at first.
But I sculpted some facial features and added an eyeball and it started to look more human.
I added ears and hair.
And even teeth and a throat.
I attached the head to the body and started to model the clothes.
Once I was happy with his outfit I started adding textures.
I then went on to model the lead female character, Josie, in a very similar way.
I did have some issues with the crotch, but this wasnt that important for this character as I changed her outfit and she would now be wearing a skirt.
When I first started modeling her head it looked like something straight out of a horror film. And even though thats the feel of the animation, this character was meant to be a pretty one.
So I decided to narrow the face, bring the eyes closer together and make the nose and mouth smaller.
After she started looking more human, I added hair and some details like eyebrows, lashes and a head band.
Once I was happy with her look, I modelled her outfit and textured the whole character.
For the other female character, the scientist, I just modified Josies body and head to make it slightly larger and "older looking".
I gave her some wrinkles around the eyes and made her smile lines more defined. The grey hair and glasses also added to her looking older and wiser.
After this I started working on the final character, the General. As before I started bloking out and shaping the body.
After adding the texture I realised the body looked like that of a stuffed turkey.
I started working on the head, adding more details such as eyebrows and mustache.
Once I was happy with the face I started modeling the clothes and texturing the whole character.
I thought I was finished but kept feeling like the character was missing something. Then I remembered - the hat!
I then started working on the UFO Scene. I had already created the background for it in Illustrator, so all I needed was a basic 3D model of a spacecraft close to the one in my animatic. So this is what I came up with.
I played around with different textures and colours, but decided to stick to grey as in the original design.
I then composited the scene in After effects with the Illustrator background.
Subscribe to:
Posts (Atom)